Search This Blog in the above block
~ I dont blog about things to be liked. I blog about things that I like ~ ... so that one day, on my death bed, I will have said and done what I wanted to do, and die peacefully without regrets.
Live your life in such a way that when your feet hit the floor in the morning, Satan shudders & says..' Oh shit....She's awake'

Monday, January 26, 2009

Hiking Wallpaper for February 2009

Herewith a Wallpaper for your desktop with the February month on it:


This picture was taken from Lions Head with a panoramic view of Table Mountain, Cape Town City Bowl, Signal Hill and Table Bay.


How to save as a wallpaper on your pc:
Right click on the image
Open in a New Tab / New Window
Right click on image
Save as a desktop / wallpaper

Tuesday, January 13, 2009

We are going places

We are happy to announce that this blog is going places.

Thanks to Scott Thompson, please check out our post on his blog Hiking Trip Reports.


Monday, January 12, 2009

Hiking Trails Checklist

I am always forgetting to take something. I especially forget to take my mace spray. Here I have created a easy to print fun hiking trails checklist for future references when you are heading off into the hills.

Suggestion: print and place on your refrigerator.


To print this image:
- right click on the image
- choose print target

or

- click on open in new Tab / Open in New Window
- go to File (top left corner)
- click Print Preview and set your document according to your printing preferences and print it.

A Wallpaper for the ladies

One for the ladies...


Its back to work for most of us today. Herewith a nice picture the ladies can upload to their desktops to keep your work day a little more interesting. Enjoy...!

(This picture was taken on my recent hike up the southern part of Table Mountain, along the Jolulu Track going towards the Boomslang Cave. I played around with it in photoshop and gave it a waterpaint type effect.)


To save above image on your desktop, do the following:
  • right click on image
  • open in a new window / new tab
  • right click on image again
  • save as desktop / wall paper / back ground (depending on your software version)

Saturday, January 10, 2009

Peter and Dani peaked Kilimanjaro

Well done to Peter Leonard and Daniela Radley for making it to the top of Mount Kilimanjaro early in January 2009!

What a perfect start to the year for the two of them. When I spoke to Dani today, she was stumbling over her words and tears of joy!

Im hoping to get more information from them on this trip soon and do a full report on their adventure.


Kilimanjaro with its three volcanic cones, Kibo, Mawenzi, and Shira, is an inactive stratovolcano in north-eastern Tanzania rising 4,600 m (15,100 ft) from its base, and is additionally the highest peak in Africa at 5,895 meters (19,340 ft), providing a dramatic view of the surrounding plains.

The highest point on Kilimanjaro is Uhuru Peak, on the volcano Kibo 5,895 metres (19,341 ft).
The top of Kibo is a 1.5 mile wide crater. As the highest point in Africa, Uhuru Peak is one of the Seven Summits. The summit was first reached by the Marangu army scout Yohanas Kinyala Lauwo, German Hans Meyer and Austrian Ludwig Purtscheller, on October 6, 1889.

Two other peaks are also dormant volcanoes: Mawenzi (5,149 m, 16,890 ft), the third highest peak in Africa (after Mount Kenya) and Shira (3,962 m, 13,000 ft). Yohanas' Notch is named after Lauwo.

Due to Kilimanjaro's equatorial location and high elevation, almost every climate type on earth is represented, including a year-round snow-topped summit.

The summit of Kilimanjaro is covered by a GSM mobile phone network, and was previously the highest point in the world with mobile phone service.

Source:
Wikipedia

Tuesday, January 6, 2009

Hiking Wallpaper Protea flower

Table Mountain has an abundance of these flowers all over the mountain. Its the photographers' birthday today, so I though Id load a picture very typical of his photography style today. Awesome shot...

Happy birthday!


To save above image on your desktop, do the following:
  • right click on image
  • open in a new window / new tab
  • right click on image again
  • save as desktop / wall paper / back ground (depending on your software version)
(Thanks again to Alex Aitkenhead for sharing this picture with us)

Monday, January 5, 2009

Cave Scrambling on Table Mountain is perfect for a large group of explorers

Hiking Trail: Boomslang Cave - Part 1 of 4

Wow, what another awesome hike this was. I am sure I am not only speaking for myself.

I have broken this hike up into 4 posts, to assist the downloading of the awesome images which go with each of them.

Below is a Google Earth image of the route that we walked.

(Click on the above image for enlarged view)

Location:
Name of Reserve / Area: Table Mountain National Park, Silvermine (East)
Nearest Town: Muizenberg, Kalk Bay and Fishhoek
Province: Western Cape
Country: South Africa

Directions to get there: From Cape Town CBD, take the M3 south. At the T-junction turn left. At the next T-junction turn right. Soon you will see a sign for you to turn right into Boyes Drive. Take this scenic road and follow it all the way up the mountain and almost to the end of the road. Use the Kalk Bay Harbour lighthouse as your landmark on your left, which is also where you will see the sign and some steep stone cut steps. This is where you can park your car alongside the road. Make sure you respect the local driveways.


Duration of hike: We started around 9h00 and got back to our cars at 13h00. This included exploring the entire cave and a short mid-way stop for a bite to eat.

Best time of year to go: According to the editor of my secret map (Mike Lundy), there is water inside the caves during the winter months and could be a muddy affair during this time. We had plenty of shade especially down in the valleys and crossed a little stream every now and again during the entire hike.

Fresh Water: There is a little stream but I would not recommend that you drink it.

Difficulty: If I had to rate this hike according to the grading scale of Mike Lundy, I would give it a 2B.

The Mike Lundy rating which is a combination of the following two grades:1 = Easy stroll;2 = Moderate;3 = Streunous excersise;4 = Only for the very fitplusA = No exposure to heights;B = Mild exposure to heights;C = Moderate exposure to heights;D = Very exposed to heights;

Pets: Yes you can bring your dog with you on this hike, but please make sure they are fit enough because it is also hard for them if they are not regularly exposed to these kinds of conditions. The wooden boardwalk inside the valleys could be difficult for their paws to negotiate and is something that you can keep your watchful eye on them.

How safe is it: I would not go alone on any of these open hikes along Table Mountain Reserve, but I felt very safe here. Always make sure you have someone on the hike with you. Keep extra protection such as a mace spray and do not expose your camera and phone too openly. The caves should only be done in large groups, always.

What costs did you incurr to do this hike: none

Pics taken by: Alex Aitkenhead, Juanita Welgemoed, Brian Spratley, Iva Lopes de Sarria.

Hikers Ratings:
I would like to invite any of the hikers who joined us on this hike to email me their rating and I will gladly put it into this post.

Juanita: I loved this hike! What an experience to go through such a long cave. The narrow passageways and large chambers were awesome to see. We were fortunate enough to have a very good torch, and could see all the details. Echo Valley and Spes Bona Valley are just breathtaking yellowwood and milkwood forrests. I call them my fairytale forrests. The group that joined us were so much fun too. Its always nice to have a crowd of enthusiastic friends and makes for awesome pictures too. Thanks to Iva for suggesting this route and to everyone who joined us on it.


Rock Art along the way!

As we were walking up, I noticed the most beautiful rock art on the path. Well done to the artist who did this.


Walk for about half an hour up this path and on your right you will find a beautiful stone cut pond known as Weary Willy's.
Do not cross this little stream (yet), but continue to follow the path up the mountain in the direction of Echo Valley Forrest.
Weary Willy's Stone Pool, Latitude 34° 7'17.69"S, Longitude 18°26'46.48"E

Your next landmark is about 15 minutes away, a place called Hungry Harry's (going up) on your right. This is a cluster of boulders forming a perfect hide out where one can take a break or just explore.
(In the picture below you can also notice Ou Kraal Koppie in the middle back ground. We passed this little hill on our return route.)
Hungry Harry's Rock, Latitude 34° 7'9.26"S, Longitude 18°26'34.73"E


Continue past Hungry Harry's up the valley for about 100m where you will find a fork in the path. Take the left fork and walk along the Jolulu Track.
Jojulu Track, Latitude 34° 7'7.87"S, Longitude 18°26'31.41"E

You will find it to be a little bit of rock scrambling on your way up.

Most of the route is easy walking and should not take more than 20 minutes to get to the top.


Soon you will be entertained by the magnificent views of Fishhoek, Simonstown and Cape Point in the far distance.


(Click on the above image for enlarged view)

We ended up stuck in one long row and Iva noted it would make for an awesome team photo (this one was captured by our Head of Photography - Alex).


Thanks Iva for getting such a cool shot of us!


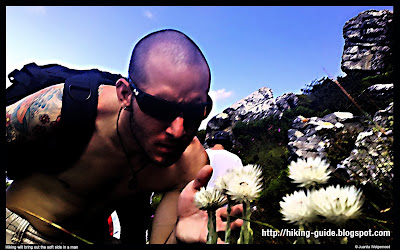
Not even a tough guy like Mitch could resist these stunning flowers. This mountain can bring out even the softer side of a man. I just loved this shot and tweaked it in photoshop to look like a painting. Right click on it and use it for a desktop ladies. It should keep your mind entertained when work sometimes gets too much.


(Click on the above image for enlarged view)
Hikers on this route:
Alex Aitkenhead, Brian Spratley, Camilla Fraser, Elizabeth Oh, Hennie Genis, Iva Lopes de Sarria, Juanita Welgemoed, Justin Groombridge,Michell Geere, Simon Bishop, Rudi Nagel.

Our next stop was the caves less than 2 minutes walk from this spot... keep reading the next post to see what we found in the stunning Boomslang Cave.

Hiking Boomslang Cave - Part 2 of 4

Hiking Boomslang Cave - Part 2 of 4

Having just come from Jolulu Track, around the next corner we came upon these 3 caves which were less than 50 meters apart.
Boomslang Entrance, Latitude 34° 7'10.86"S, Longitude 18°26'21.92"E
The first cave was called White Dome Grotto. A large obvious hole on the edge of this rock wall.
This was not the cave we planned to explore, but the guys did pop their heads inside to have a look.
Then about 10 meters to the left of the above cave (White Dome Grotte), we passed the cave we were planning to explore (Boomslang Cave), just to have a quick look at the cave called Avernus (which was about another 20m to the right of Boomslang).

Hidden inside another stunning Yellowwood grove is the cave Avernus.


Soon the moment of glory came. In the middle of the two caves is a massive crater in the rock. This is where the entrance to Boomslang Cave is.


Looking back we saw the subburbs of Fishhoek.
Everyone got their candles and torches out and headed into the abyss of darkness.

(click on the above image for a larger view)
The most important thing to remember about this cave is to follow the direction of the breeze you feel on your face. Take it slow and you will soon know where to go.


We came upon massive chambers all over the place.


The passages soon becomes narrower and you will find yourself to be bending down lower and lower all the time untill you are on your hands and knees. By this time you will be able to see 'the light at the end of the tunnel'.


(Click on the above image for a larger view)
About an hour later, and pumped with adrenalin, we emerged from the exit point of the cave.
Boomslang Exit Point, Latitude 34° 7'7.27"S, Longitude 18°26'21.60"E


The exit point of the cave is approximately 150 meters from where the entrace. As soon as we reached the other side, it was a perfect time and spot to enjoy a snack and refuel for the next leg of our route.
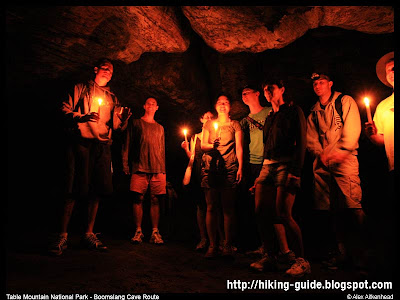


From here we followed the path down the mountain back to where we came from at the Echo Valley Path which merged with the Jolulu Track.
Jojulu Track, Latitude 34° 7'7.87"S, Longitude 18°26'31.41"E
Our next adventure was the Echo Valley Boardwalk and The Amphitheatre...

Hiking Boomslang Cave - Part 3 of 4

Having just come from the exit of the Boomslang cave, we walked about 15 minutes down the mountain to reach the Echo Valley path. This is where we turned left onto the path to follow the track again upwards in the direction of the valley.

Jojulu Track, Latitude 34° 7'7.87"S, Longitude 18°26'31.41"E


Echo Valley is another wooden boardwalk built inbetween a Yellowwood forrest. I love these boardwalks and makes these walks so much more fun and interestingto explore.

Echo Valley Path, Latitude 34° 7'4.73"S, Longitude 18°26'24.77"E


The Echo Valley path come to a t-junction. This is where you turn right towards The Amphitheatre.
T-Junction Latitude 34° 6'53.67"S, Longitude 18°26'6.02"E


The 15 mintute route to The Amphitheatre must have been the most beautiful display of flowers I have seen on the mountain so far.


Amphitheatre, Latitude 34° 6'51.18"S, Longitude 18°26'7.62"E
The Amphitheatre is an open space surrounded by the mountain from all sides. There is a stone cut beacon in the middle of the sandy pit - as you can see in the pic below. On this day it was very hot inside this wind break spot.
Once leaving The Amphitheatre, you follow the route on the left side of the mountain up towards Spes Bona Valley - I would say this was another 20 mintute walk to get to Spes Bona Valley.


Continue to read about the next part of our hike, which takes us down into Spes Bona Valley.

New to reading blogs?

I have heard so many people saying they are new to reading blogs. Here is the 'low down' of what you need to do:

1. The blog is written in date order. Latest posts are at the top and older posts below them. Older posts have a link to them - find the link if you scroll right to the bottom of this screen - see Older Posts.
2. Click on the post header if you wish to make comments below the articles. Comments are most welcome :)
3. I blog our hikes to help other people find nice hiking routes, but also because we love taking pictures on our hikes.
4. On the right column are images of some of the hikes we have done so far. Click on the images to read about those hikes.
5. Subscribe to my newsletter if you wish to get updates of new posts. I will not inundate you with mails - promise.

Thanks for reading my blog and hope you enjoy the read.

There is an old saying...

The more you learn, the more you realize how little you know.